
Learn how orchestration in Frends and Azure Logic Apps enables effective workflow management through parallel execution and conditional branching, enhancing integration capabilities.
Let us begin by unpacking the term orchestration a bit. Orhcestration is (at least in the context of this blogpost) the way that a task is arranged into a chain of smaller tasks, which may also be referred to as a workflow. For example, the task of moving customer data from one system to another might consist of fetching said customer data from the source sytem, validating the data of each customer, enriching the data if needed, transferring customer data to the target system and sending a notification email once everything is done.
If we were to implement this workflow using Frends, it could look something like this:
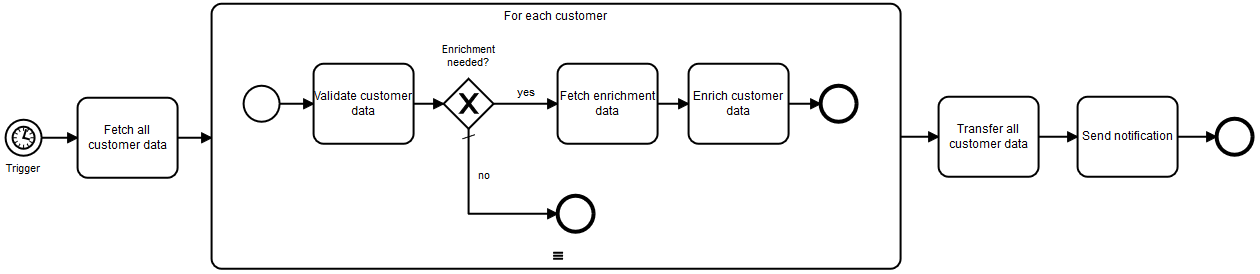 Figure 1: An example orchestration for moving customer date using Frends.
In an integration consultant’s life, orchestration is at the core of development, and not all cases are as straightforward as the one depicted above; sometimes efficiency considerations lead to a need for parallelization, sometimes more complex branching based on the results of different workflow steps is required. However, not all programs and platforms that can be used for implementing integrations provide the same possibilities for orchestration. In some cases, the differences are mostly superficial, but in others they may dictate how things can be implemented. I have recently had the opportunity to do some work using Azure Logic Apps and since I am already familiar with frends, this has given me the opportunity to compare the orchestration capabilities of these two products.
Parallel execution
Both Logic Apps and frends are able to branch a workflow into branches that are executed in parallel, which means activities can be performed simultaneously. Figure 2 shows an example implementation with Logic Apps, where the first step is to start the execution of three different activities simultaneously and, in one of the branches, continue with the execution of two additional activities once the first activity has finished. Once all activities in all three branches have finished, the branches combine, and one additional activity is performed.
Figure 2: An example of a Logic Apps implementation of a branching workflow. 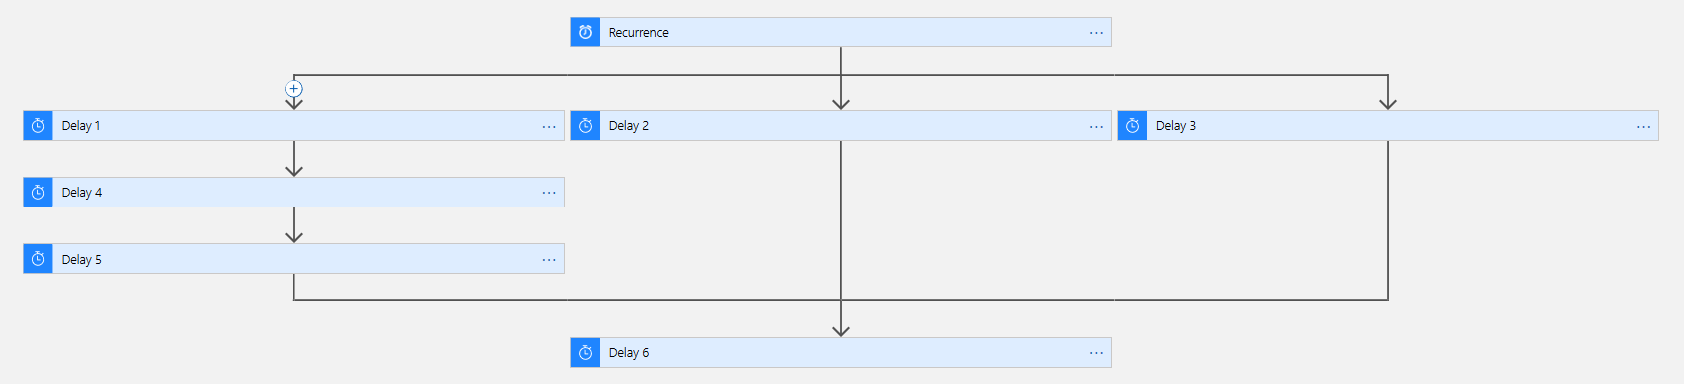
An almost identical workflow implemented using Frends can be seen in Figure 3.
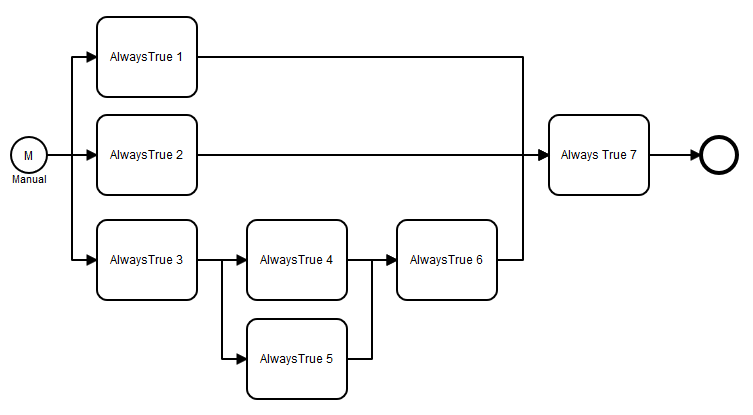 Figure 3: An example of a Frends implementation of a branching workflow.
At this point, it is worth noting a few quite obvious visual differences between frends and Logic Apps. First, the natural direction of the workflow is from left to right in frends, and from top to bottom in Logic Apps. I do not think either approach is inherently superior, so preferring one over the other is mainly a matter of personal, well, preference. Second, the activities in Logic Apps are flat but very wide, whereas the activities in frends are nearly square shaped in comparison. The proportions of Logic Apps activities have the advantage that you can fit many of them on screen in the direction of the workflow. The downside is that the width of the activities causes branching to take a disproportionately large amount of space. In frend branches require less space, which helps when working with complex workflows. However, the view fills up quicker in the direction of the workflow than in Logic Apps.
Looking at the Frends implementation of the workflow, it should be easy to spot why I mentioned it was almost identical to the Logic Apps implementation: One of the branches has an additional branch that merges back into the parent branch before all three branches merge into one. This branch has been added to the workflow as the last step (before naming the activities), after all the other branches and activities were in place. Implementing this same workflow is possible using Logic Apps, but it is more cumbersome without pre-planning, since branches cannot be branched further once the branches have merged into an activity. In addition – and unlike in frends – the arrows that connect the activities cannot be deleted and added freely. Instead, the arrows are drawn automatically when activities themselves are deleted and added. This means that re-arranging an orchestration once it has been created can be quite clunky. For example, if we wanted to implement the same logic shown in Figure 3 after we have already created the workflow shown in Figure 2, we would first need to delete the activity that is performed last (Delay 6). If additional steps would have been added after this activity, those would need to be removed as well.
Conditional execution
It is quite common that a workflow needs to be branched when certain conditions are met. While meeting these conditions can sometimes have a lot of different factors, most cases tend to fall into one of these categories:
- Do A, but if x, also do B.
- Do A if and only if x, otherwise do B.
- Do A if x. Do B if y. Do C if z.
Logic Apps provides two ways of implementing a conditional branching: The Switch activity and the Condition activity. Of these, the Switch activity enables branching based on the result of a condition. There can be several different conditions, but these are always equality comparison between two values. In other words, it is possible to check if a value is 3, 7 or 10, but it is not allowed to check if the result is larger than 15. In addition, it is possible to define a default branch, which is executed if none of the conditions are met. Thus, each condition is unique and only one of the branches can be executed, which means that with the Switch one can implement an exclusive version of the logic of the third category listed above (ie. only one of x, y and z can be true at a time). If one would like to implement logic that allows more than one condition to be met at a time, the workflow could, for example, first be branched into several branches with a Switch in each one. It is also possible to implement the logic of the second category using the Switch if one defines only one condition with a default branch. Figure 4 shows a very simple example of using a Switch with two conditions. Meeting one of the conditions leads to the execution of two activities and meeting the other leads to the execution of one activity. If neither condition is met, nothing is done before moving on to the next step in the workflow.
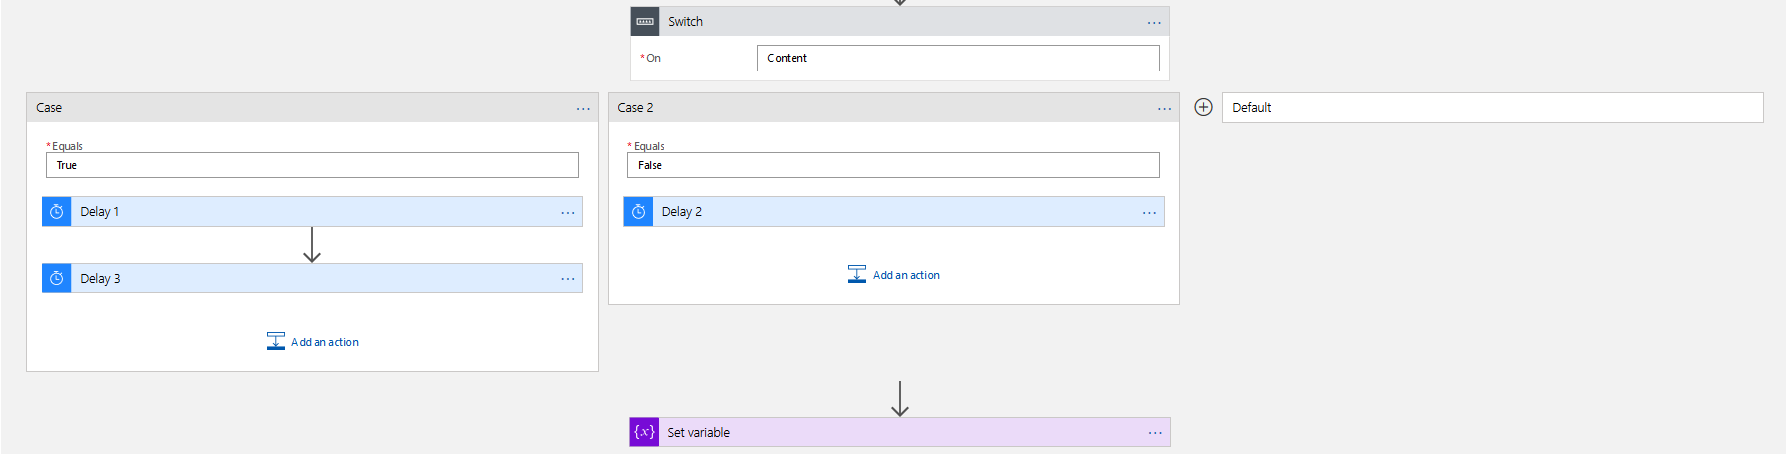 Figure 4: An example of branching a workflow in Logic Apps using a Switch activity.
In addition to the Switch activity Logic Apps provides also the possibility for an ”if – else” type of branching using the Condition activity. In this activity it is possible to define both singular conditions and groups of conditions – which can also include or consist of groups of conditions. Comparisons are then compared using an ”OR” (is true if any of the compared conditions evaluate to true) or an ”AND” operator (is true if all of the compared conditions evaluate to true). These comparisons can be performed within a group of conditions, between singular conditions or between singular conditions and groups of conditions. Furthermore, the conditions themselves do not have to be equality comparisons as was the case with the Switch, although there is still only a fixed set of options. All of this means that it is possible to build quite complex rules for the execution of the ”If true” branch. Since in the end only one of two branches will be executed, the Condition activity enables the implementation of the logic of the second category listed above. To implement the logic of the first category, one would need to first branch the workflow into two branches and set up a Condition in one of them. The example in Figure 5 does not implement a complex conditional execution. Instead, there are two conditions and if either one is true, the two activities in the ”if true” branch are performed. If not, the one activity of the ”if false” branch is performed. After one of the branches is executed, the workflow moves on to the next step.
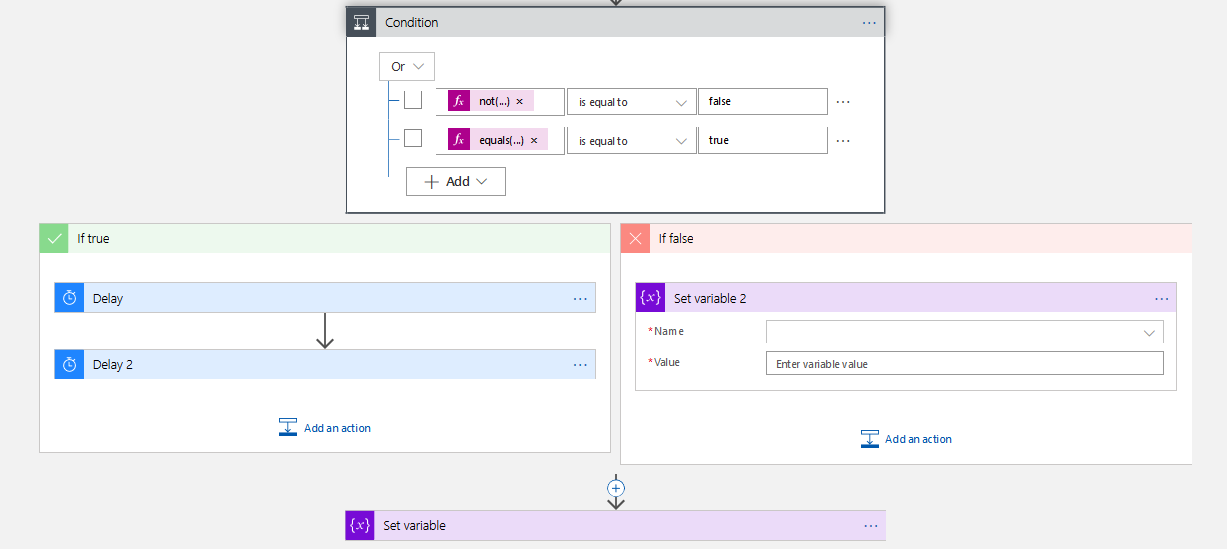 Figure 5: An example of branching a workfow in Logic Appsin using the Condition activity.
Frends also provides two ways of conditional execution: Inclusive Decision and Exclusive Decision. The latter of these is like the Condition activity of Logic Apps in that based on the set condition (or a group of conditions), one of two branches is executed, enabling the implementation of the logic of the second category with the first category requiring branching before the exclusive decision. The main difference between the Condition activity in Logic Apps and the Exclusive Decision in frends is that the condition statement in the Exclusive Decision is not built using a given set of rules. Instead, as long as the whole thing evaluates to either true or false, it can be defined freely and may even include simple code statements.
The Inclusive Decision of frends lets the user branch the process based on more than one condition, but it differs from the Switch in Logic Apps in that each condition can be as complex as the condition in an Exclusive Decision and the conditions do not necessarily need to be unique. In addition, the default branch – which does not need to be set – is executed always, not only when no other conditions were met. This means that with the Exclusive Decision one can implement branching that includes parallel execution under certain conditions as well as branching which only executes one branch out of several, thus covering the logic of both the first and third category mentioned earlier without the need to branch the workflow beforehand. In fact, using the Inclusive Decision one could also implement the logic of the second category, but using the Exclusive Decision for this is simpler and clearer.
Figure 6 shows an example where first two out of three branches of an Inclusive Decision are executed along with the default branch. After these the condition of the Exclusive Decision would determine which of the two branches is executed. If we wanted, we could end the workflow in both branches of the Exclusive Decision instead of combining the branches into one return activity. This is something that cannot be done with the Inclusive Decision activity. Instead, all of the branches of the inclusive decision must combine and eventually lead to a single activity before the workflow can be stopped in a controlled manner. This limitation comes from having to account for the possibility of parallel execution.
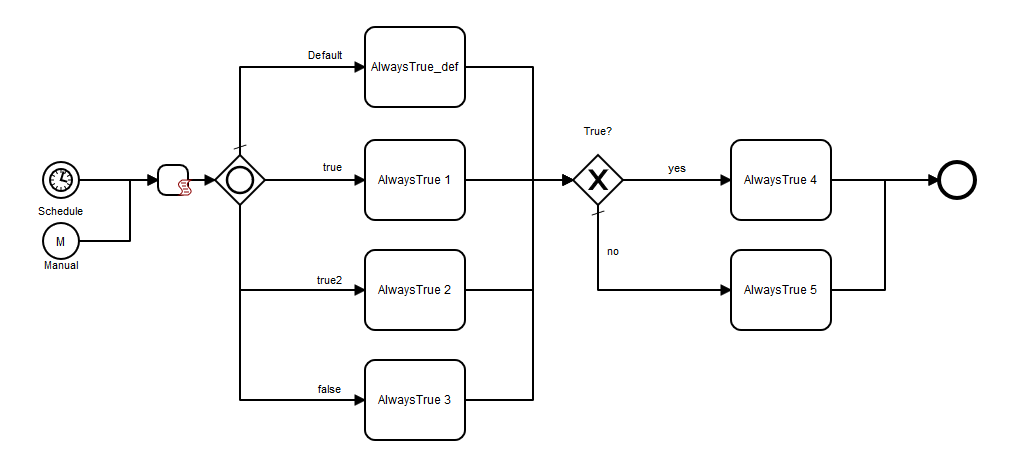 Figure 6: An example of branching a workflow in frends using both an Inclusive Decision activity and an Exclusive Decision activity.
Summary
Both Frends and Logic Apps enable a variety of ways to orchestrate a workflow through parallel execution and conditional branching. In conditional branching frends offers a bit more flexibility, which simplifies the implementation of certain conditional logic. However, the most significant difference between the two may be the following: the ability to freely remove and add the arrows that connect the activities in Frends without the need to remove activities they connect to. This makes it easier to implement changes which would require rearranging previously implemented logic. Adding complexity to existing branching is also easier in some cases.
The differences between frends and Logic Apps are of course not limited to the ones mentioned in this blog post. There are diffences in, for example, the available activities, user interface, platform architecture, reusability of implementations and version control. In other words, there are plenty of topics to look into in future blog posts!